Part I: The Head | Part II: The Body | Part III: Clothing & Shading
April 14, 2004
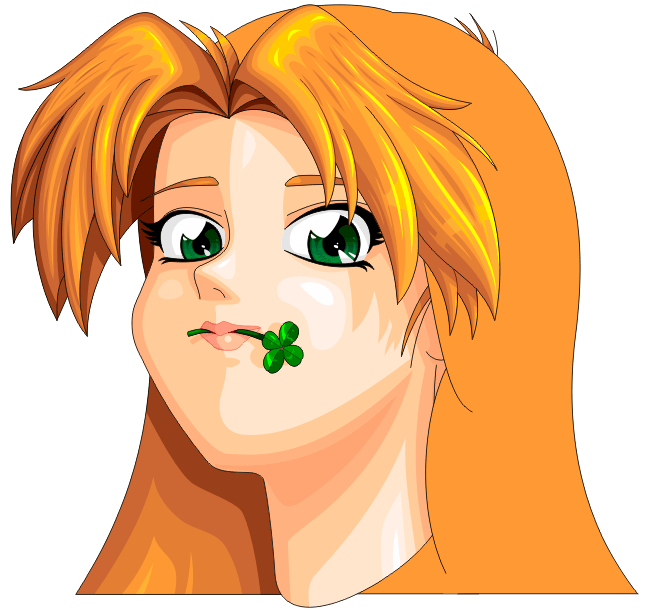
I've had some people ask questions about how I draw these things, so
I thought that when drawing Katie McBride, I'd post images at regular
one-hour intervals of work so that you can see what goes on in my head
while I'm working. Each of the images below is clickable; if you click
it, you can see a much larger version.
| |
Click image to zoom in
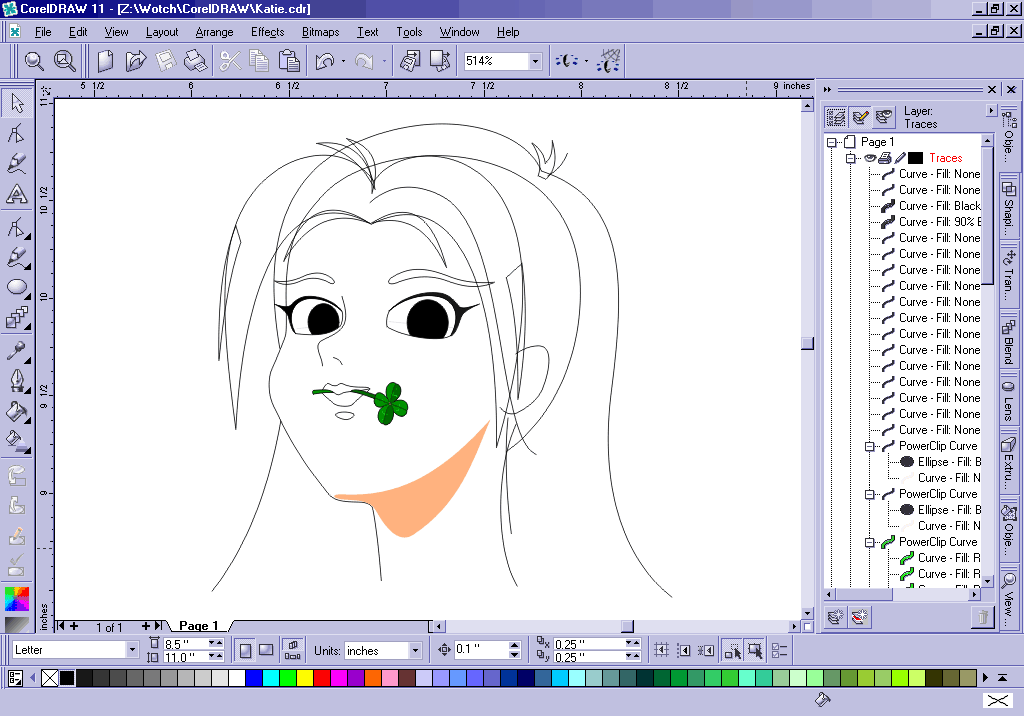
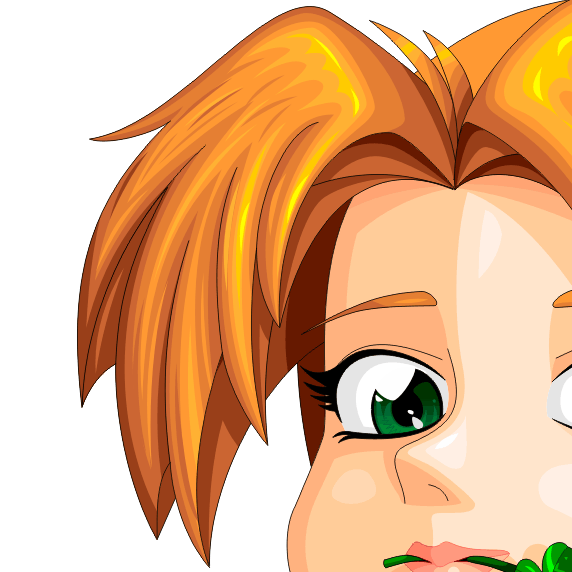
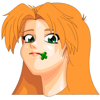
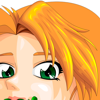
 | | 1. Very sketchy after the first hour
This is after the very first hour. The first step is to lay down a
few lines to get a feel for what the image ought to look like.
There's not much to look at, but already the basics of her facial
shape and attitude can be seen. Many of these lines are out-of-place,
and will be moved into better positions as the work progresses; there's
at least four more hours of work on her head alone before she'll be done.
There's not that much else to say at this stage; you either have the
ability to sketch a basic head shape or you don't. The best suggestion
if you're trying to learn to do this is to start simple: Draw a basic
egg shape, and put marker lines where the facial features ought to be
(if you click the image to magnify it and look closely, you'll see
two of my lingering marker lines still in her eyes). Specifically,
you'll want a vertical line running down the middle of the face that
will show where the nose and mouth will be centered; and you'll want
a horizontal line where across the middle of the egg where the eyes
will be; and you'll want another horizontal line halfway down from
there where the mouth will be. Once you've got the basic egg and
marker lines, draw the facial features over the lines. Then add the
hair lines, and finally get rid of the marker lines. If this
description isn't really good enough for you, consult a good art book. |
|
| |
Click image to zoom in
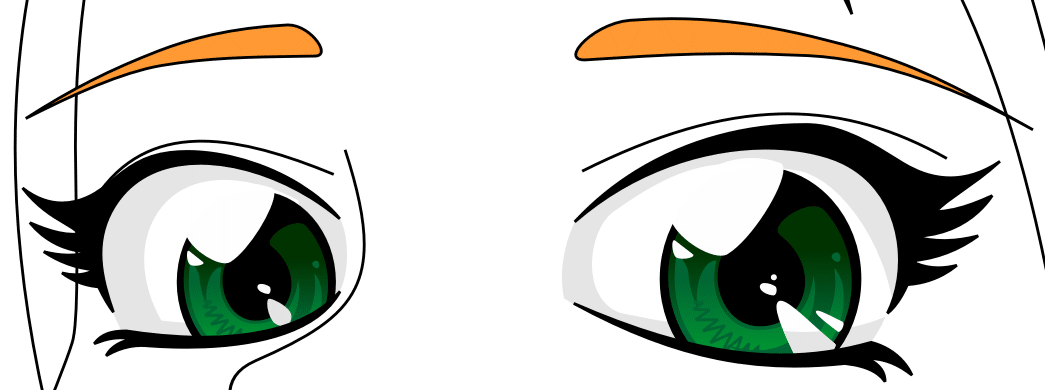
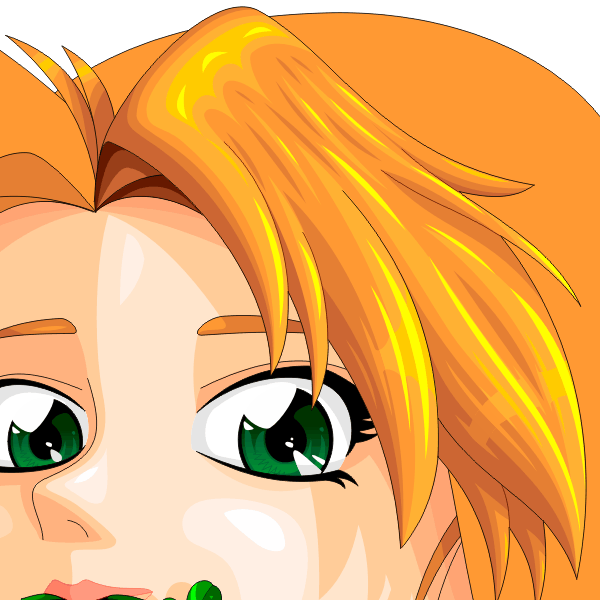
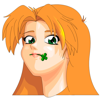
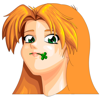
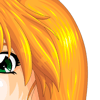
 | | 2. Make the eyes look good in the second hour
I first moved the crown of her hair farther back, since her head is
tilted, although it looks like I may have moved it too far. After that,
I gave her more realistic and lady-like eyebrows. In total, that was
only about five or ten minutes.
I spent the rest of the time working on her eyes, on getting all the
shapes and shines just right. Eyes are
important; they give a character life. Even with nothing else really
done on her, she has a certain "realism" now that wasn't there before.
The first step was to first get the shape of the eyes to what I wanted;
then I fixed up her eyelashes so they were big and black with the
"Cleopatra" look that shows up in a lot of good anime and manga. No
doubt Katie's using a bit of makeup to get them that big and black.
|
|
| |
Click image to zoom in
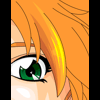
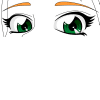 | | After doing the eyelashes, I went into her eyes and drew the irises,
first as a green ring around the black pupil, and then covering up
various parts of the green ring with black and white to simulate shine.
The green ring is shaded slightly and divided down the middle to make
it look more like a real iris instead of just a green ring. Once I
got the one iris right, I copied it to the other eye, adjusting the
size, and removing some of the shiny bits since it's in shadow. Last
but not least, I put shading around the whites of the eyes, since they
are partially in shadow. If I were really ambitious, I could try to
darken the eyes to just a little less than full-white, which would
make the shine seem brighter than white; but I don't think that will
be necessary here. |
|
| |
Click image to zoom in
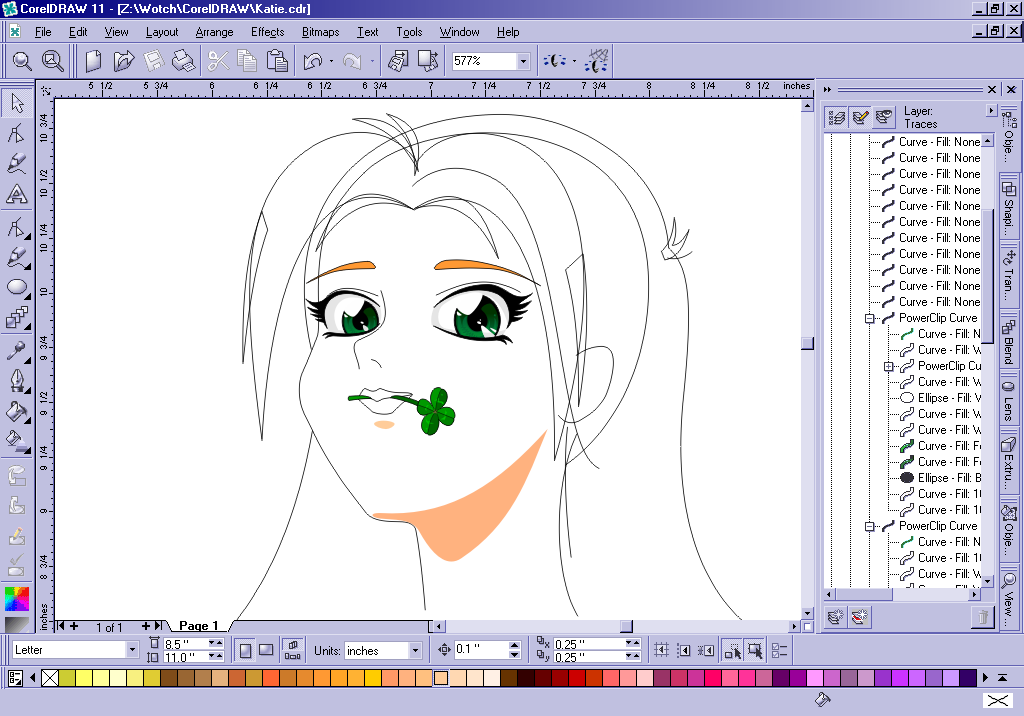
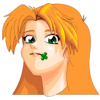
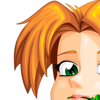
 | | 3. Get the hairstyle right; then flat-color everything in the third hour
Okay, so I moved the crown back up a bit, and then took away the
placeholder bangs and put in real ones. These big, poofy cascading
bangs are far more realistic; of course, nobody actually has
bangs quite like these big poofy things, but this is art, and we can
take a little artistic license and ignore gravity when it's convenient.
Besides, there were hairstyles that did some of this back in the '80s
when people were using too much hair conditioner, so it's not
an unbelivable hairstyle. Note that although the right and left sides
of the bangs look very different, if they were true 3D models, they would
be very similar, and could conceivably be mirror-images or nearly so.
This is significant; since she parts her hair in the middle, both sides
ought to be the same, to within the limits that most peoples' left and
right sides are the same.
Once the hair has a good style to it, the only remaining thing is to
play connect the dots... er... connect the lines. We go through the
image, selecting parts that ought to be more-or-less the same color,
and join them together to make closed shapes; and then we fill them
with a suitable color. This image is the result. |
|
| |
Click image to zoom in
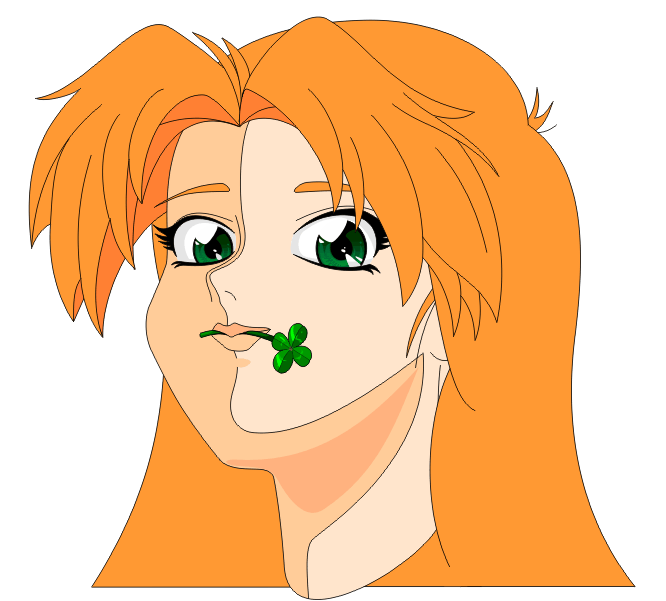
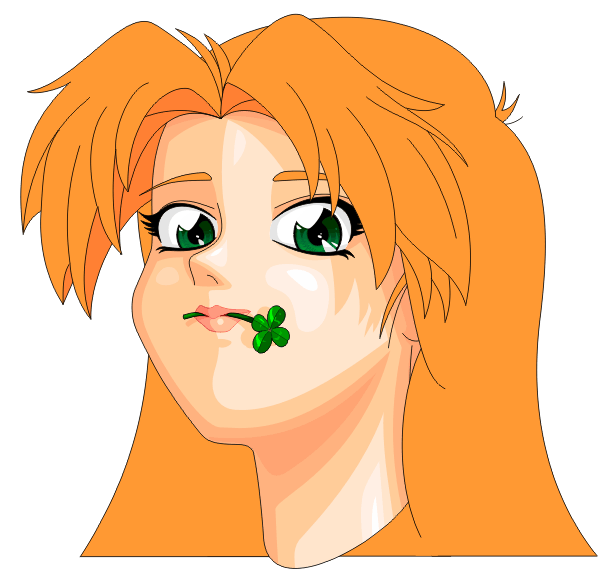
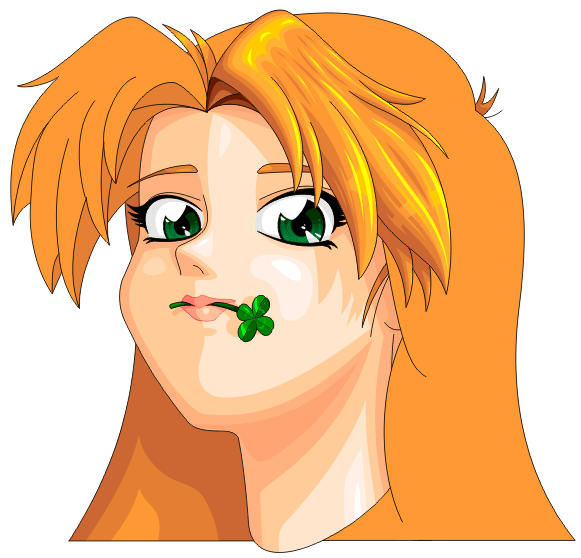
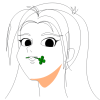
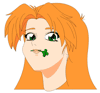
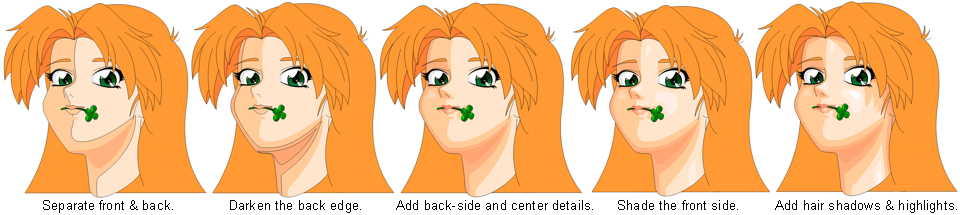
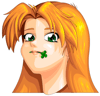
 | | 4. Finish any facial details; then shade the face in the fourth (plus) hour.
This stage is complex enough that I have broken it into several parts.
Our objective is to finish the face in this stage. First, that means
fixing any little details, such as the position of the mouth or the
clover she's holding in it. When the little details are taken care
of, then we have to start the real shading.
The first step in the real shading is to figure out which direction the
light comes from (in this case, to her left, in front of her; or beside
the camera to the camera's right). When we know that, consider the part
of the face that points toward the camera and call it the "front" side,
and the part of the face that points away from the camera is the "back".
When you know where those two parts are divided (which, in this case,
happen to be right down the middle of her face), you draw a line right
between them and color the "back" part one level darker than the "front",
which should be whatever the person's skin color is.
|
|
| |
Click image to zoom in
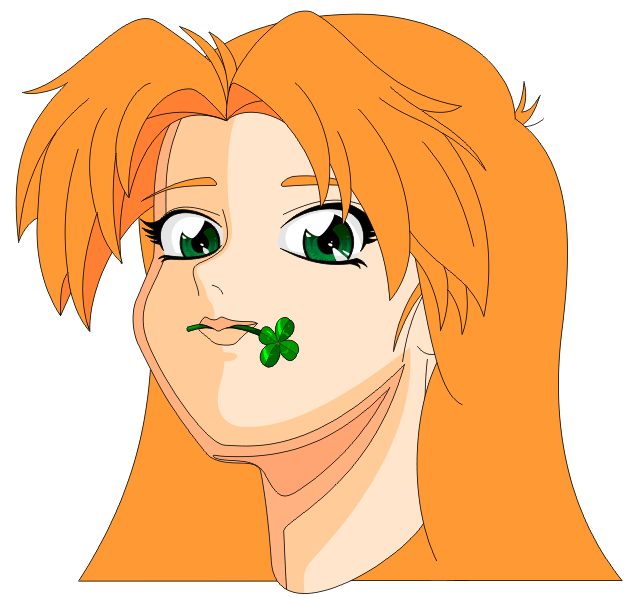
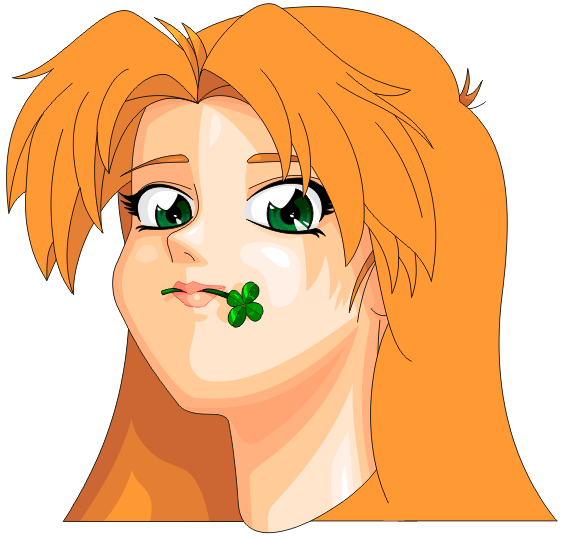
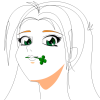
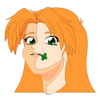
 | | (Part 4b.) The face has been separated into "front" and "back"; now we go around
the outer edge of the "back" part and shade it darker yet. Anything
that is supposed to be even darker (like under her chin) will get darkened
again to compensate for this change. You can see that I shrank the
extra-dark part under her chin because much of the required shading there
would already be taken up by the dark "back" part. |
|
| |
Click image to zoom in
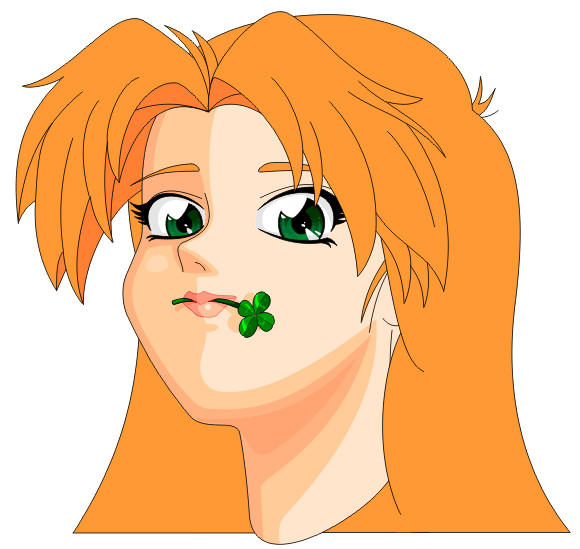
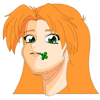
 | | (Part 4c.) Next, take care of shading details on the "back" part of the face.
Her right eye socket gets darkened. A slight glow is added on her
cheekbone. A suitable shadow is added below her nose to make it
stick out and look triangular. Her lips are colored and shaded down
the front/back line, with a glow-circle added on the bottom lip to
indicate the shine of lipstick; and the clover's shadow is projected
onto her face. |
|
| |
Click image to zoom in
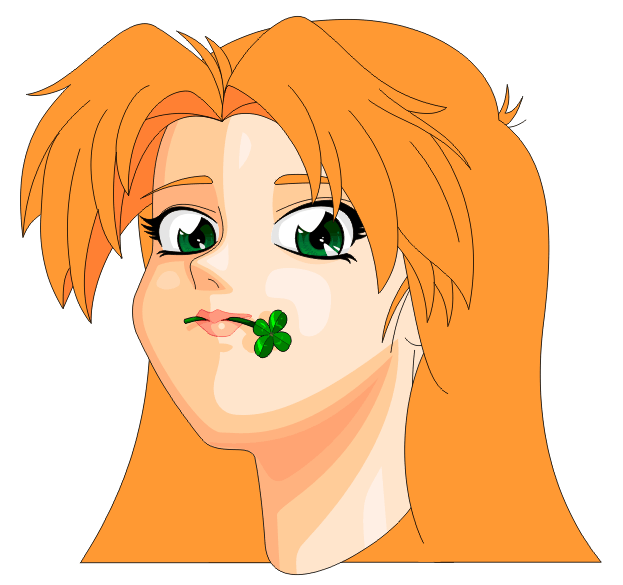
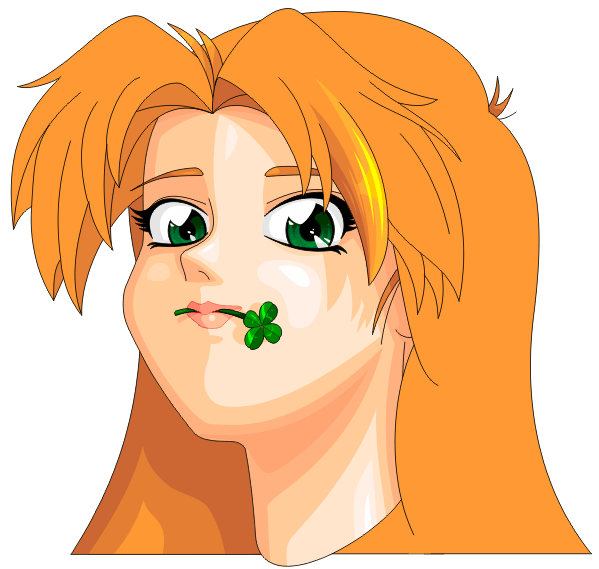
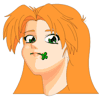
 | | (Part 4d.) On the right side of her face, we go through and add the rest of the
"natural" shading: That's shading and highlights that would be there
if her hair weren't there. Thus a shadow in her left eye-socket;
a glow on her nose and forehead; a glow on her neck; and a glow on her
left cheek to highlight the cheekbone. |
|
| |
Click image to zoom in
 | | (Part 4e.) Last, but certainly not least, we project the shadow of the hair onto
the face. Where the hair is far from the face, the hair must be far
from its matching shadow; where the hair is close to the face, the hair
must be close to its matching shadow. We shade extra-dark in places
where the hair would block even more light, such as near the back of
her head and neck, her ear, and near the roots of her bangs. We also
darken part of the left-eye socket to indicate that the bangs are
blocking some of the light that would fall on the eye (but never, ever
darken the eye itself except for its white part: If you darken the
iris or pupil, the person will look dazed, confused, or dead).
I also added a little extra white highlight in the highlighted areas
to emphasize the smoothness and shininess of the skin (she must use
moisturizer!).
|
|
The facial shading can easily take an hour or more, depending on how many
levels of shadow and highlight you intend to use (and whether you intend to
use blending or blurring to make their edges smoother); in Katie's case, it
was about an hour and a half in total.
Because there are so many
different steps that take place during the shading, and because the steps
change the image in such subtle ways, it can be useful
to compare the stages side-by-side to more easily see the differences
between them:
| |
Click image to zoom in
 | | 5. Start shading the hair in the fifth (plus) hour.
This stage is also complex, so I have broken it into several parts.
Shading hair is difficult. It gets even more difficult when you want
it to look realistic, and even more difficult when you want it to
look hyper-realistic (as in Katie's case). In high school, I asked
my art teacher how to draw hair; he told me something rather noncommittal
at the time, and that was where the subject dropped. I learned much
later why he couldn't give me a good answer: Although hair does have
some defining characteristics, the majority of it has to come from your
own imagination. So I'm going to try hard to explain this stage, but
most people will either just get it or they won't, and no
explaining will really help those who don't. Sorry.
|
|
| |
Click image to zoom in
 | | (Part 5a.) We'll start simply. Initially, we can conceive of the
hair to just be a solid almost plastic-like object, stiff and
molded into shape. That's not true, but it's good enough for this
stage. The face casts a shadow on Katie's right-side hair (our left side),
because the light source is obviously sitting over our right shoulder.
Thus we start by darkening the back part of the hair as though it were
solid plastic. This is a good time to do some other simple darkenings
as well; the eyebrows, for example, have to follow the same shading
as the face, as if they were just painted on; and little tufts of hair
can usually be quickly painted as well (like between her bangs, at her
crown, and behind her ear). In most cases, we're just darkening things
that have shadows falling on them from either some other part of the hair
or from the face. |
|
| |
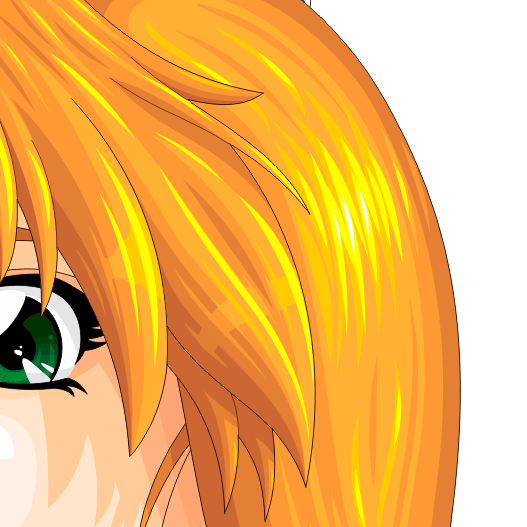
Click image to zoom in
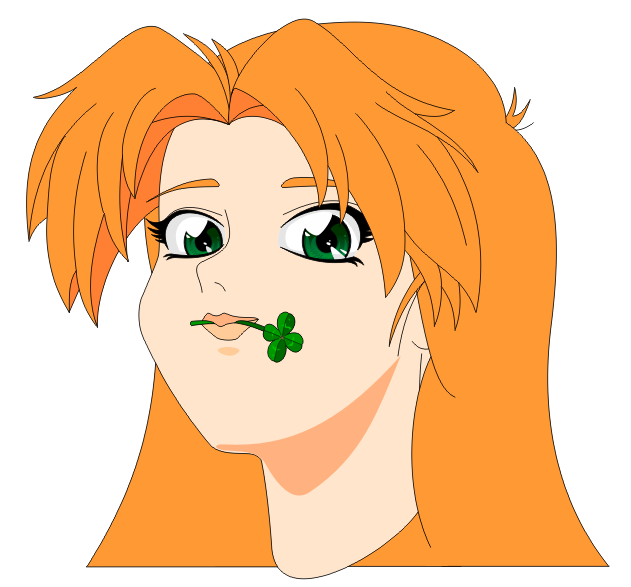
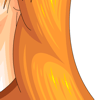
 | | (Part 5b.) Katie is going to have shiny, glowy hair.
The official description for her
says that she has "firey red hair", and we're going to take that to an
extreme. Nobody has hair this good, but everybody wants hair this
good; it's another example of anime-styled artistic exaggeration.
Thus while the base color of her hair is a nice orange, and the shadows
are a red-brown, the highlights are going to be bright neon yellow. |
|
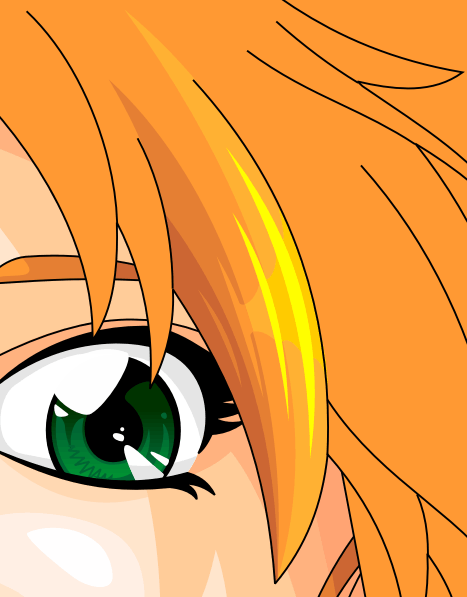
| |
Click image to zoom in
 | | Let's take a closer look at that single shaded tuft of hair.
There are several things to notice about it. First, the near edge has the
bright yellow where it reflects the light source; the far edge has a gentle
brown for the shadow. The gentle change in colors makes it look round, so
that it has volume; and the bright streaks make it look like it's composed of
many individual strands. Last, but not least, there is a horizontal
"bar"-shape that hints at how strongly the hair reflects the light source. |
|
| |
Click image to zoom in
 | | (Part 5c.) Alright, so now that you know how to do one tuft, can you
do them all? Take a close look at this and see where the shines and shadows
are placed. Shines point to the light source; shadows point away. There are
streaks to indicate that the hair is made of many strands, and here are
horizontal bars to directly reflect the light source (the bars are a very
anime/manga-thing, although often there they're done as simple zig-zaggy
white lines). In addition, we use a dark, rich reddish brown underneath
the bangs at the widow's peak; the extra dark color will help accentuate the
shininess of the rest of the hair. |
|
| |
Click image to zoom in
 | | Still having a hard time seeing how this works? Take a look
at this close-up of the hair and see if you can figure it out. |
|
| |
Click image to zoom in
 | | 6. Do the other half of the bangs in the sixth hour
Okay, this is just as complex as the first half of the bangs, but by now
you should have the basic principle figured out. Since most of this faces
away from the light, it will be mostly shadowed. Some of it faces toward
the light, and there you'll see yellow highlights. As usual, there are
streaks to indicate that the hair is composed of strands. In addition,
I've added just a little more detail to the back side of the hair below
her chin to suggest that there are strands there also, and darkened some
of that area to strengthen the highlights elsewhere.
|
|
| |
Click image to zoom in
 | | Here's a close-up of the left-side bangs to help you see
what's happening. These are mostly streaks and shadows; there's very
little else required. |
|
| |
Click image to zoom in
 | | 7. Do the rest of the hair in the seventh (plus) hour
Here's a close-up of the left-side bangs to help you see
what's happening. These are mostly streaks and shadows; there's very
little else required. |
|
| |
Click image to zoom in
 | | Here's a close-up of the shine on the side of her head.
Notice that it's composed mostly of curvy streaks. In the center
of it, there are some white streaks; this is the only place white
is used (or necessary) in her hair. Notice how the streaks follow
the curved path of the hair itself, and actually help define
that path. |
|
| |
Click image to zoom in
 | | Here's a close-up of the shine on the lower part of
her hair. Notice how the shadows in the middle of this picture
imply that the upper part of her hair is pulled behind this part,
that this "sticks out" from behind that hair. Real hair has many,
many more layers that do that, but we only need enough here to
hint that it's happening for the eye and the mind to do the rest.
Notice also how few streaks are necessary here to make the hair
look like it's composed of many strands; and noice also how the
streaks are lined up such that they seem to form a "band" of
brighter area across the hair. That "band" should exist throughout
the hair, and it should always point to the light source; notice
that there is another similar band near the top of this picture.
|
|
The hair shading can easily take three or four hours or more, depending on
how many levels of shadow and highlight you intend to use and how complicated
you want to make it. Remember that simpler is better, and if you can successfully
pull off a look with very few lines (as in the last picture above), by all means,
do it. Don't overcomplicate when you don't have to.
Next: Part II: Drawing The Body >>
Copyright © 2003-2017 by the Phantom Inker. All rights reserved.